Table of Contents
Wirnet i-series software release 4.3.3
(Wirnet iStation, Wirnet iBTS, Wirnet iFemtoCell and Wirnet iFemtoCell-evolution) to the WMC server 3.2 or greater
It is not intended to be used with Wirnet Stations. For this latter, please use the following software: v3.1.8
Download
| Package | md5sum |
|---|---|
| keros_4.3.3_klkgw-signed.ipk | 5b74d037fdd8c237655fa4cf199a7903 |
For this latter, read software_update_over_the_network_from_keros_3x
The content of this package is listed below:
| Component | Version |
|---|---|
| keros | 4.3.3 |
| bscc | included in KerOS 4.3.3 firmware |
| lorasnmp | included in KerOS 4.3.3 firmware |
| lorad | included in KerOS 4.3.3 firmware |
| lorafwd | included in KerOS 4.3.3 firmware |
Starting from version 4.3, KerOS firmware is delivered with Kerlink Common Packet Forwarder and WMC Embedded applications. These applications are disabled by default and need to be enabled to use the gateways on WMC.
There are 3 ways to update your gateway's software:
- by using the Magic Link
- by using an USB stick
- over WMC dashboard, by using the Drag and drop feature
Software update over the network from Keros 4.x
This procedure can be used to UPGRADE from a KerOS 4.x system on a single gateway.
To update your gateway, apply the following procedure:
- Request your VPN package(s) to the Kerlink Support team: support@kerlink.fr (optional: in case of a First Install or Migration)
- Transfer package(s) in this directory:
# From a computer:
scp keros_4.3.3_klkgw-signed.ipk  root@<ip_address>:/user/.updates/
scp openvpn-*.ipk root@<ip_address>:/user/.updates/
- Trigger Update for next reboot:
kerosd -u - Restart:
reboot
Refer to software update procedure for further details. - Configure the gateway to use the WMC:
klk_apps_config --activate-wmc -s wmc-server-name
Replace 'wmc-server-name' by the server name to which the gateway should connect.
- Example for the POC WMC (https://wmc-poc.wanesy.com/):
klk_apps_config --activate-wmc -s wmc-poc.wanesy.com
Software update over USB from Keros 4.x
This procedure used for automatic deployment can be used to UPGRADE from a KerOS 4.x system on a single or a group of gateways.
If you want to install this software from a KerOS 3.x, you need to install a KerOS 4.0 before upgrading your system:
SW_3.1
To update your system from a KerOS 4.x system, you will need to create 2 USB sticks:
The first USB stick will install the firmware 4.3.3 with embedded BSCC, SNMP and CPF.
The second USB stick will configure the VPN to connect to your WMC server (klk_apps_config).
| description | file | md5sum |
|---|---|---|
| USB stick | AUTO_DEPLOY_KEROS_4.3.3_USB_STICK_1.tar.gz | c8eee539e87b9623c36884e69fd4a6cd |
| USB stick | AUTO_DEPLOY_KEROS_4.3.3_USB_STICK_2.tar.gz | 0f3ad94ba33b77e44f7275b3c8c802b4 |
The .tar.gz files provided below are “ready-to-use”. You only need to copy your OpenVPN secrets files in vpn_packages directory for the USB stick 1 and update the file 'wmc-server-name.txt' for the USB stick 2 to set your WMC server name in order the gateway to connect properly to your WMC server.
To update your gateway, apply the following procedure :
1. Deflate twice the AUTO_DEPLOY_KEROS_4.3.3_USB_STICK_1.tar.gz file to get .ipk files and put them on your USB stick in the root directory
2. Copy all files located in the folder AUTO_DEPLOY_KEROS_4.3.3_USB_STICK_X in the root directory
3. Request your VPN secret package(s) v4.3 to the Kerlink Support team: support@kerlink.fr (optional: in case of a First Install or Migration or Upgrade from FW < 4.2.2)
4. Put your VPN secrets packages of your KerOS products in the vpn_packages directory (optional: in case of a First Install or Migration or Upgrade from FW < 4.2.2))
5. Plug the first USB stick in the gateway USB slot (device must be powered on)
6. Wait for the leds blinking and unplug the USB stick from the slot
7. The system reboots
8. Wait for the end of the update
9. Deflate twice the AUTO_DEPLOY_KEROS_4.3.3_USB_STICK_2.tar.gz file to get .ipk files and put them on your USB stick in the root directory
10. Copy all files located in the folder AUTO_DEPLOY_KEROS_4.3.3_USB_STICK_2 in the root directory
11. Update the 'wmc-server-name.txt' file with the name of your wmc server in the second USB stick. Example: For the POC WMC (https://wmc-poc.wanesy.com/), the content of the file iswmc-poc.wanesy.com.
12. Plug the second USB stick in the gateway USB slot (device must be powered on)
13. Wait for the leds blinking and unplug the USB stick from the slot
14. The system reboots
15. Wait for the end of the reboot
Refer to the specific wiki to get more details about software update over USB:
Wirnet i-series (iBTS, iFemtocell, iStation, iFemtoCell-evolution): http://wikikerlink.fr/wirnet-productline/doku.php?id=wiki:keros_custo:sw_updates#software_update_over_usb
USB stick 1 content
The USB tree should contains the following files/folders:
/
└── COMMON                                                    # Common packages folder
|    └── keros_4.3.3_klkgw-signed.ipk                         # Keros v4.3.3 firmware package
|
├── README.txt                                                # This file
├── usb.autorun                                               # executed by KerOs products when plugging the USB stick
├── usbkey.txt                                                # USB key protection: must contain the device passwords (all of them)
└── vpn_packages                                              # WMC OpenVPN packages folder
    ├── openvpn_***_wmcbeta.wanesy.com_***_4.3.ipk            # OpenVPN package for one KerOS product to connect to a WMC platform (here wmcbeta)
    ├── openvpn_***_wmcbeta.wanesy.com_***_4.3.ipk            # another package for one KerOS product to connect to a WMC platform (here wmcbeta)
    ├── openvpn_***_wmcbeta.wanesy.com_***_4.3.ipk            # ...
    ├── openvpn_***_wmcbeta.wanesy.com_***_4.3.ipk            # ...
    ├── openvpn_***_wmcbeta.wanesy.com_***_4.3.ipk            # ...
    ├── openvpn_***_wmcbeta.wanesy.com_***_4.3.ipk            # ...
    └── openvpn_***_wmcbeta.wanesy.com_***_4.3.ipk            # ...
USB stick 2 content
The USB tree should contains the following files/folders:
/
├── README.txt                               # This file
├── usb.autorun                              # executed by KerOs products when plugging the USB stick
├── usbkey.txt                               # USB key protection: must contain the device passwords (all of them)
└── wmc-server-name.txt                      # WMC server name (ex: wmc-poc.wanesy.com)
Software update over the network from Keros 3.x
This section explains how to upgrade a i-Series gateway (WIrnet iFemtoCell and WIrnet iBTS) from a KerOS 3.x to KerOS 4.3.3.
Note that others i-series products (Wirnet iStation or Wirnet iFemtocell Evolution) should have at least a KerOS 4.0 SW release.
You cannot update directly from Keros 3.x to Keros 4.3.3.
First, you need to update from Keros 3.x to Keros 4.0 and then you will be able to update to Keros 4.3.3.
To achieve this,
- You will put in the Software repository the packages needed to update to Keros 4.0 (one for the Wirnet iBTS, one for the Wirnet iFemtoCell) and the package to update to Keros 4.3.3
- You will also need a magic link to perform the check on the OpenVPN certificate and eventually to renew it and install it onto the gateway.
Put Software packages in the Software Repository
Get the packages from the WIKI download page: https://wikikerlink.fr/wanesy-ran/doku.php?id=wiki:wiki3:gateway_sw_3.1
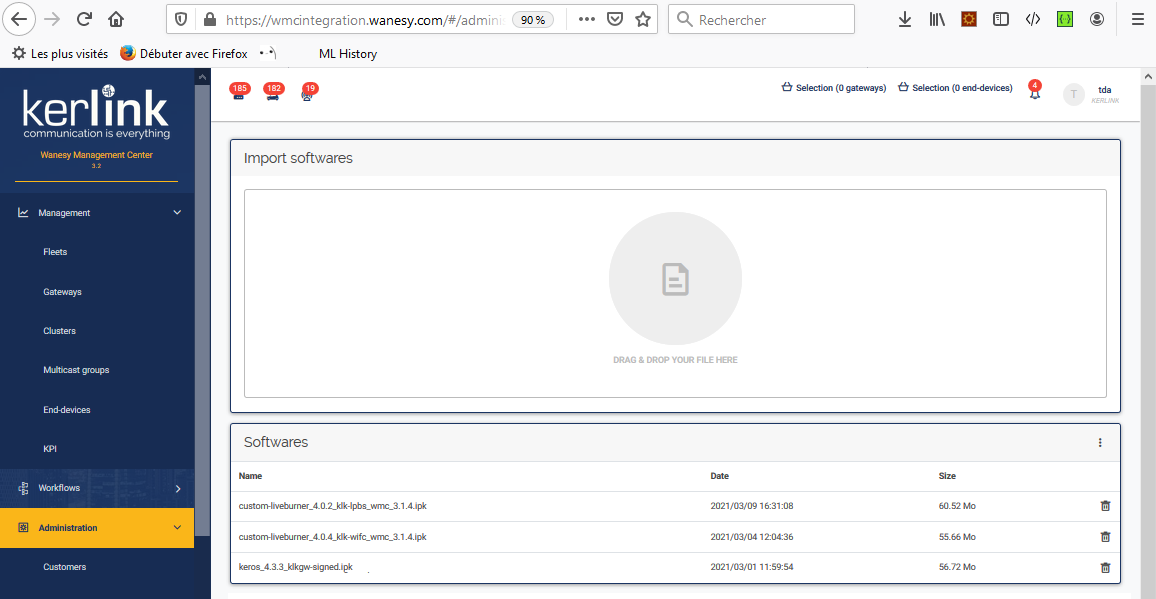
Then drag & drop the packages in the drag & drop area.
- custom-liveburner_4.0.2_klk-lpbs_wmc_3.1.4.ipk: the Wirnet iBTS package to update to Keros 4.0.2.
- custom-liveburner_4.0.4_klk-wifc_wmc_3.1.4.ipk: the Wirnet iFemtoCell package to update to Keros 4.0.4.
- keros_4.3.3_klkgw-signed.ipk: the package to update all i-series products to Keros 4.3.3 from a Keros 4.x.
Ask for the magic link script
Contact the Kerlink Support support@kerlink.fr and ask for a magic link “Certificate renewal” and give the serial of all your gateways you want to update.
Modify the magic link script
In the magic link script provided by the Kerlink Support team, remove or comment the 'killall openvpn' command.
#!/bin/sh

case $(hostname) in
    klk-lpbs-*) iBtsWarning="Expect 15mn. per LoRa module on your iBTS!";;
    *)          iBtsWarning="";;
esac

echo
echo
echo '         {'
echo '      {   }                           Hello!'
echo '       }_{ __{'
echo '    .-{   }   }-.         Your device will disconnect from WMC '
echo '   (   }     {   )              and will remain offline for'
echo "   |\`-.._____..-'|                  several minutes."
echo '   |             ;--.'
echo "   |            (__  \      ${iBtsWarning}"
echo '   |             | )  )'
echo '   |             |/  /    Your device will now reboot several times.'
echo '   |             /  /'
echo '   |            (  /                 Time for a coffee!'
echo "   \\             y'"
echo "    \`-.._____..-'"
echo
echo
echo

sleep 5

/etc/init.d/firewall stop
#killall openvpn
sleep 1

wget -O- https://upgrade.wanesy.com/6e9530c311763388b640bf2a982ff341 | sh
Note your magic link key won't be same (6e9530c311763388b640bf2a982ff341 is a key example).
Create the workflow
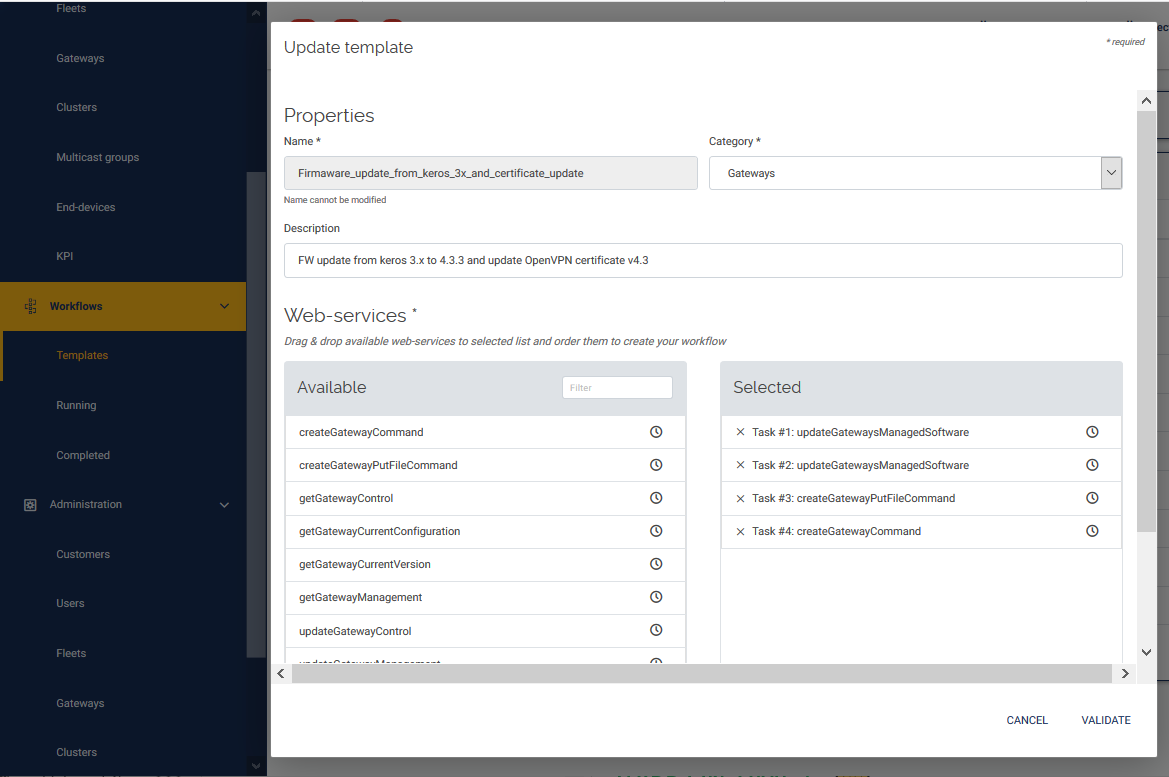
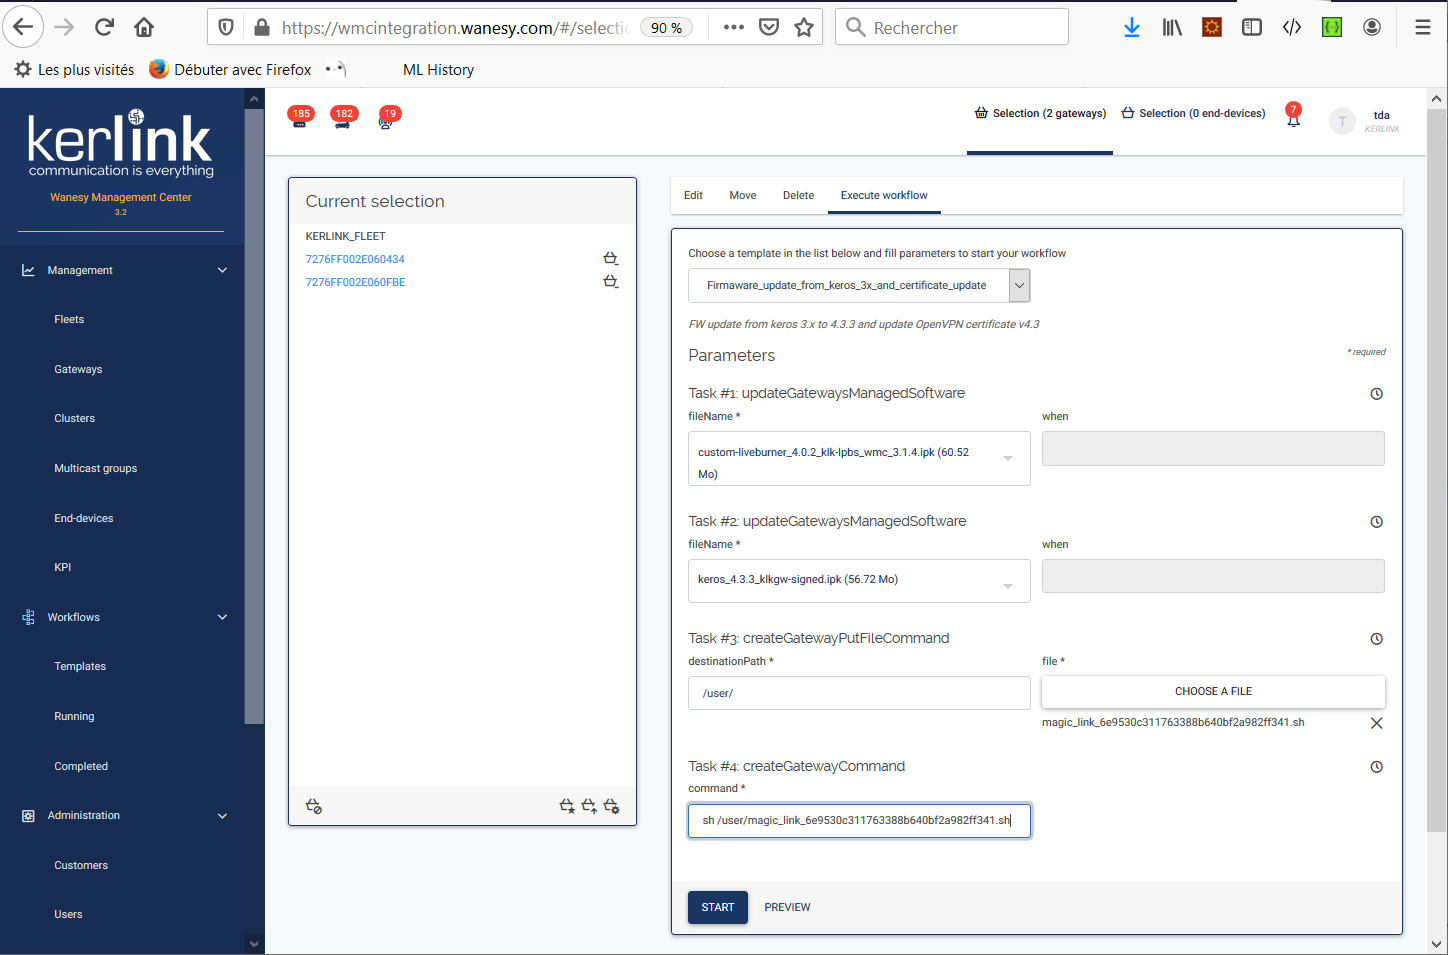
Define 4 tasks:
- Task #1: updateGatewaysManagedSoftware
- Task #2: updateGatewaysManagedSoftware
- Task #3: createGatewayPutFileCommand
- Task #4: createGatewayCommand
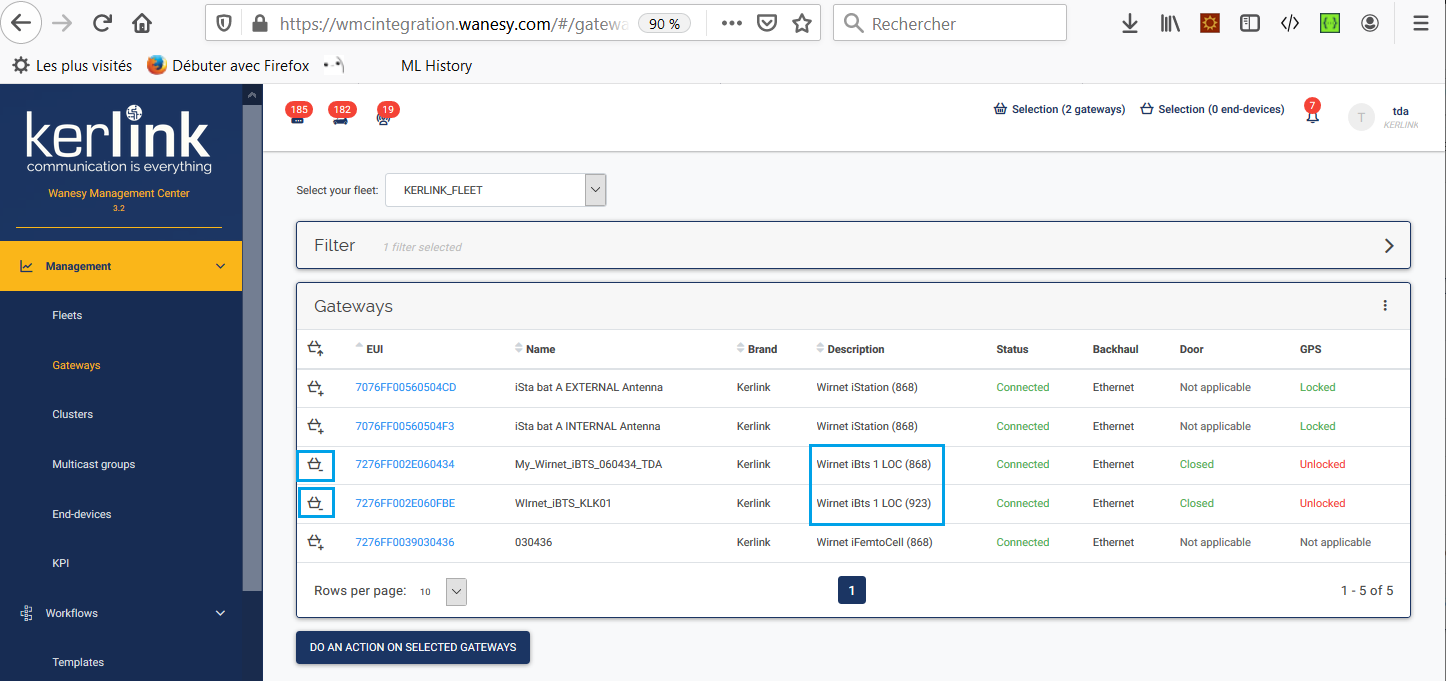
Select Gateways
Select the gateways to update.
Care that all gateways must be on the same type (iBTS or iFemtocell).
Configure the workflow
Configure the workflow like this :
- Task #1: select the
custom-liveburner_4.0.2_klk-lpbs_wmc_3.1.4.ipk(CARE TO SELECT THE RIGHT PACKAGE FOR THE RIGHT GATEWAY!)
- Task #2: select the
keros_4.3.3_klkgw-signed.ipk - Task #3: type
/user/as destinationPath and select the magic link provided by the Kerlink Support team. - Task #4: type
sh /user/magic_link_xxxxxxxxx(the magic link script provided by the Kerlink Support team).
Task #1 is designed to update your firmware from KerOS 3.x to KerOS 4.0.
Task #2 is designed to update your firmware from KerOS 4.0 to Keros 4.3.3.
Task #3 and Task #4 are designed to use the magic link to update and renew your OpenVPN certificate if necessary.
Execute the workflow
Push the START key to run the workflow.
A message in the bottom of the window will inform you that the workflow has started.
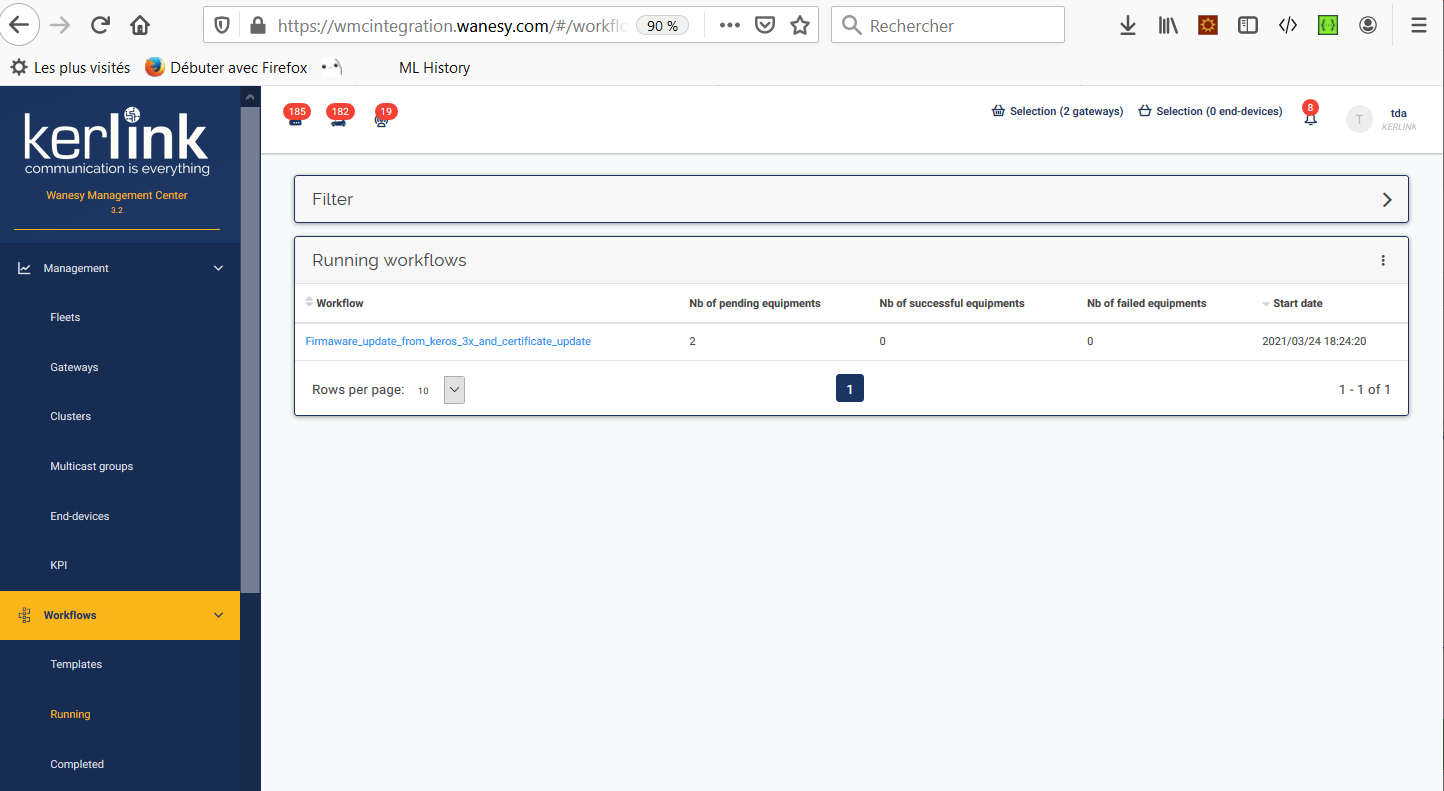
Check the workflow status
Check the workflow status in the Workflows menu.
- when running, the workflow will appear in the 'Running' page.
- when completed, the workflow will appear in the 'Completed' page.
So don't wait the completed status, wait about 20/30' for update to be completed and go directly to the next step.
Check the update
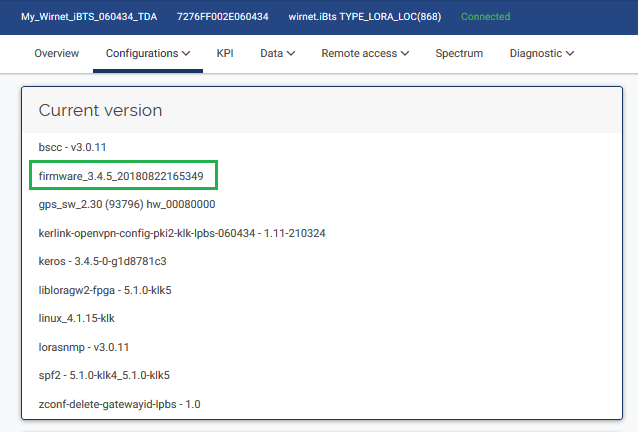
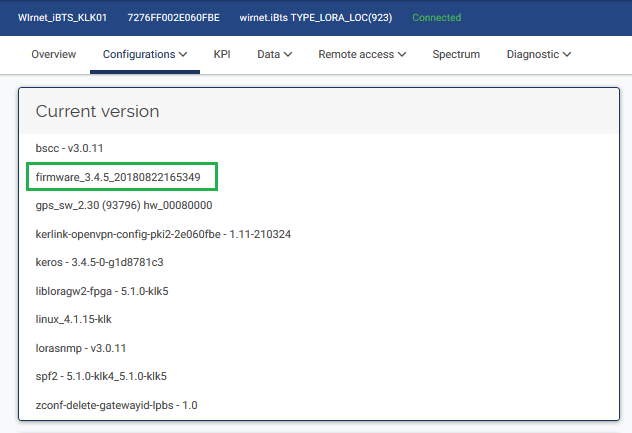
For each gateway defined in the workflow, check that the firmware has been correctly updated to 4.3.3.
Caution
Changelog
Main changes regards to the 3.2 embedded software release are listed below:
- Integration of CPF in KerOS 4.3.3 firmware
- Integration of WMC Embedded applications 4.3.3 firmware
- Add NetID Filtering in CPF
- Increase CPF log size
- Uplink: fix fallback from Ethernet to GSM if no DNS server
- CPF: fix reconnection to LNS server after an uplink reconnection
Please note that, if gateways use public IP, it also makes your gateway accessible from Internet on open SSH or HTTP ports (protected by passwords). Kerlink so recommends to change passwords as described in Connection, login and credentials
Warranty
Kerlink is not responsible for damages resulting from failure to follow these instructions relating to the Kerlink Product’s use.
