Setups
Installation
Configuration
Helium
Solana
Troubleshooting guide
FAQ
Setups
Installation
Configuration
Helium
Solana
Troubleshooting guide
FAQ
Ethernet* The maximum Ethernet cable length is 100m

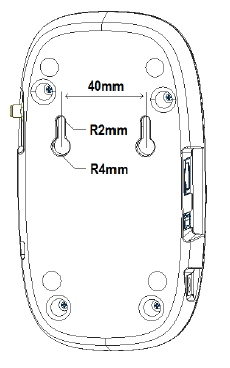
The Wirnet iFemtoCell-evolution may be mounted on a wall using the two oblong holes.
Only two screws (not included) are needed, all mounting information is mentioned on the following drawing: /!\ Never use hooks!


Once the Wirnet iFemtoCell-evolution is installed, you can select up to 2 technologies to access to Internet for the data backhaul:
Note that both configurations can be used in parallel. For example, RJ45 Ethernet with a 4G/3G link as a backup.

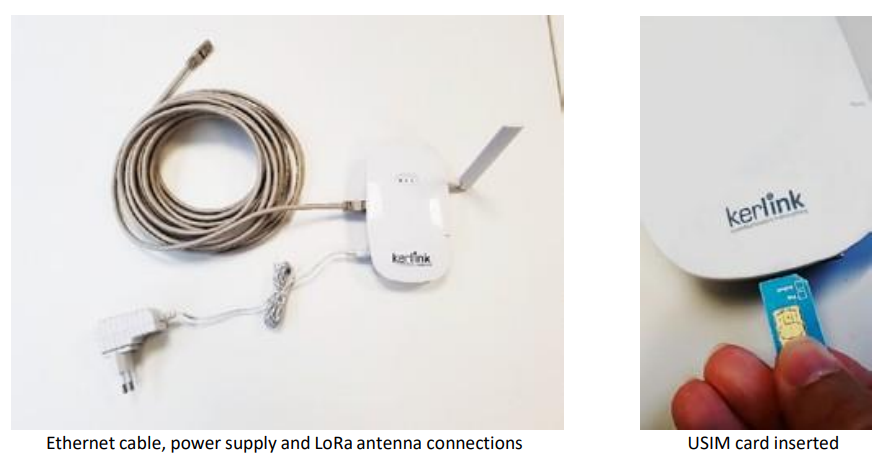
Once the LoRa RF antenna, the Ethernet cable (if used) or the 4G/3G (with USIM card inserted) and the power supply jack connector are plugged, the Wirnet iFemtoCellevolution can be powered ON by connecting the power supply.
Once the LoRa RF antenna, the Ethernet cable (if used) or the 4G/3G (with USIM card inserted) and the power supply jack connector are plugged, the Wirnet iFemtoCellevolution can be powered ON by connecting the power supply.
The button available on the right of the hotspot and accessible thanks to a tool with a 1mm diameter allows to reset the hotspot as follow:
The easiest way to connect to your hotspot is to address it by name.
http://klk-fevo-XXXXXX.local
For the Wirnet iFemtoCell with 704BEc1234AB as board ID, the hostname will be: klk-wifc-1234AB.
It is also possible to enter the IP address of your hotspot into your browser’s URL bar (Make sure your computer is on the same local network).
The default credentials are:
Login:admin
Password:pwd4admin
It's very recommended to change them.

Using local connection through USB-C.
The network can be easily configured thanks to the web interface.
The cellular access can be configured in the web interface.
Cellular connection requires an USIM and a data subscription (not included)
To test if the configuration is the good one, please just unplugg Ethernet cable and wait for some minutes, the backhaul should automaticaly switch to cellular connection. You may use the onboarding dashboard to check connectivity after 15-30 minutes.
The Full Miner communicates over a peer-to-peer (P2P) network and needs to connect to the remote port 44158.
The Light Hotspot → Validator connection is a standard gRPC connection. The default port Validators listen on is 8080 so Hotspots should be able to connect Outbound to that port.
Hence, other miners must have this port forwarded to their miner IP address, and so should you. Indeed, other miners will want to connect to your miner too.
More info on port forwarding can be found on Helium documentation:
Firmware and miner updates are managed by KERLINK.
Kerlink is a member of LoRa Alliance and the Kerlink hotspot is compatible with LoRaWAN protocol. If you need information about LoRaWAN network protocol please contact the LoRa Alliance and request LoRaWAN specification : https://lora-alliance.org/lorawan-for-developers