WMC v3.x wiki
Introduction
Quick Start
System Management
Network Management
SNMP
Push
LoRa features
GMS API
Troubleshooting
Gateway software resources
WMC 3.2:
Server software resources
WMC 3.2:
FAQ
WMC 3.x:
WMC 3.0:
WMC 3.1:
>= WMC 3.2:
>= WMC 3.1:
Introduction
Quick Start
System Management
Network Management
SNMP
Push
LoRa features
GMS API
Troubleshooting
Gateway software resources
WMC 3.2:
WMC 3.1:
WMC 3.0:
Server software resources
WMC 3.2:
FAQ
WMC 3.x:
WMC 3.0:
WMC 3.1:
>= WMC 3.2:
>= WMC 3.1:
The first thing to do is to install the software that allows the gateway to connect to the WMC.
You need to know the current WMC software release and then select the appropriate software to install according to this WMC software release version.
To know the WMC version, you must have an account to connect to your WMC dashboard. If you don't have any, please contact the Kerlink Support team: support@kerlink.fr .
Click on your profile icon at the upper right of the page and select About item:
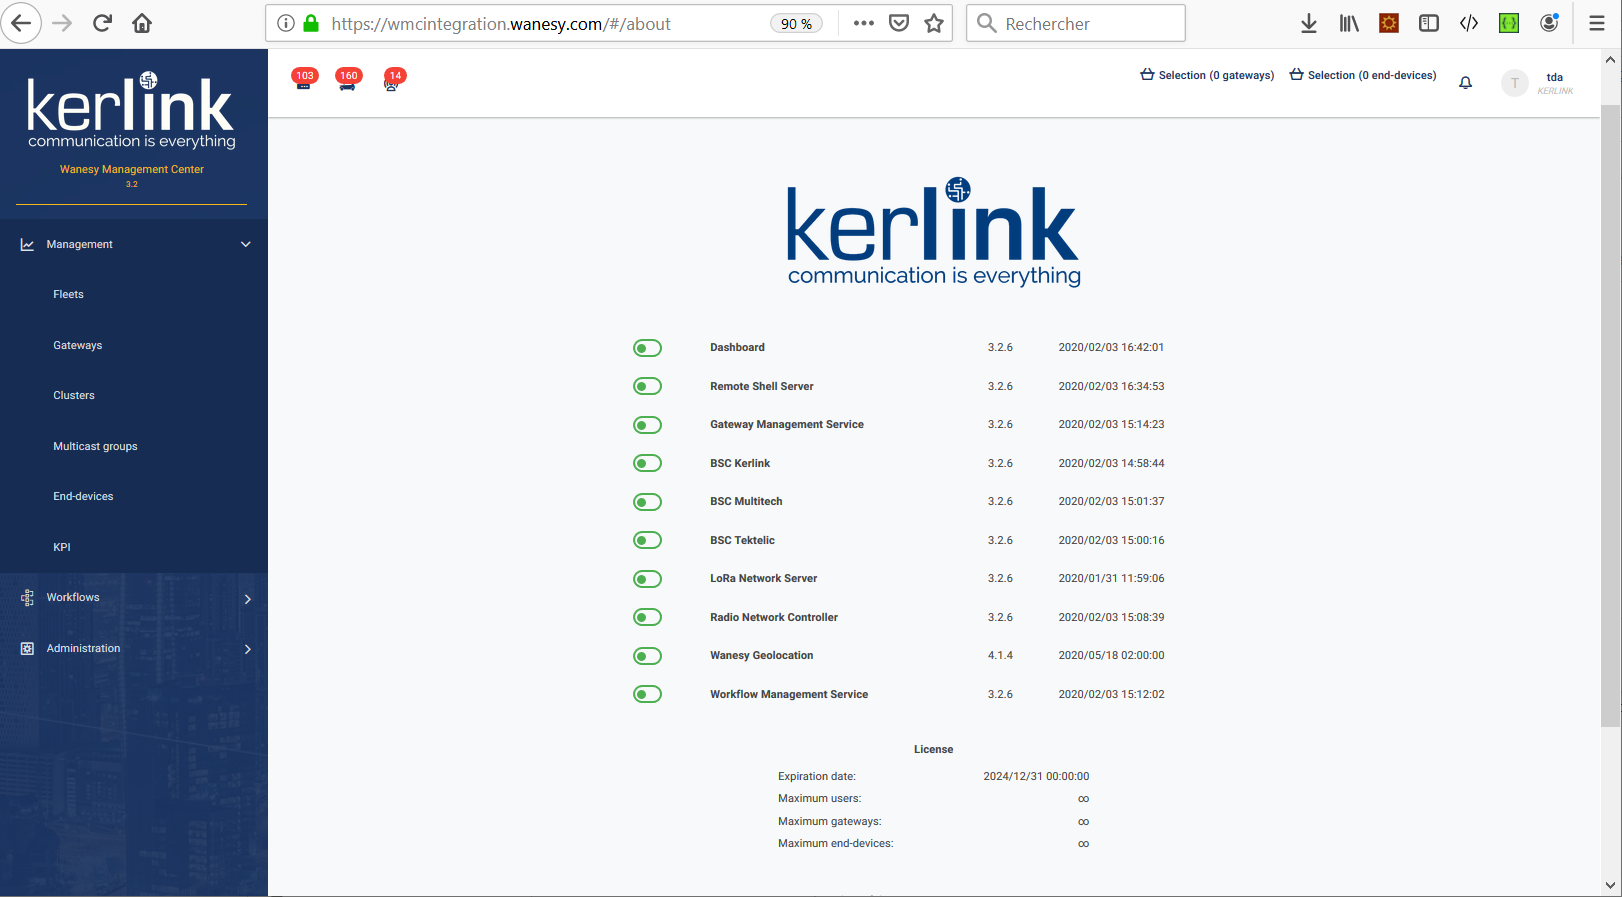
The WMC version is the version of the Dashboard component. For instance, in the screenshot above, the WMC version is 3.2.6.
Before installing the software, read the release note about your software release version here
The connection to the Wanesy Management Center (WMC) requires several software packages to be installed on the gateway:
For previous versions, these packages are brought together into a single package called a “megapackage”. This specific software is also called the “embedded software”. The version of the megapackage to install depends on the WMC software release.
Click on the line that matches your WMC version:
| WMC version | KerOS products | Wirnet Station |
|---|---|---|
| WMC 3.2 | Wirnet i-series Software Release v5.9 | Wirnet Station embedded sofware 3.1.8 |
| WMC 3.2 | Wirnet i-series Software Release v4.3.3 | Wirnet Station embedded sofware 3.1.8 |
| WMC 3.1 | Embedded Software Release v3.1.4 | Wirnet Station embedded sofware 3.1.6 |
| WMC 3.0 | Embedded Software Release v3.0.11 | Wirnet Station embedded sofware 3.0.10 |
The upgrade procedure is described here:
| WMC version | Embedded Software Version |
|---|---|
| WMC 3.2 | Gateway Software Install WMC 3.2 |
| WMC 3.1 | Gateway Software Install WMC 3.1 |
| WMC 3.0 | Gateway Software Install WMC 3.0 |
Once gateway embedded software has been installed, you have to configure the WMC: create your customers, create your fleets, declare your gateways, create your clusters and declare your end-devices.
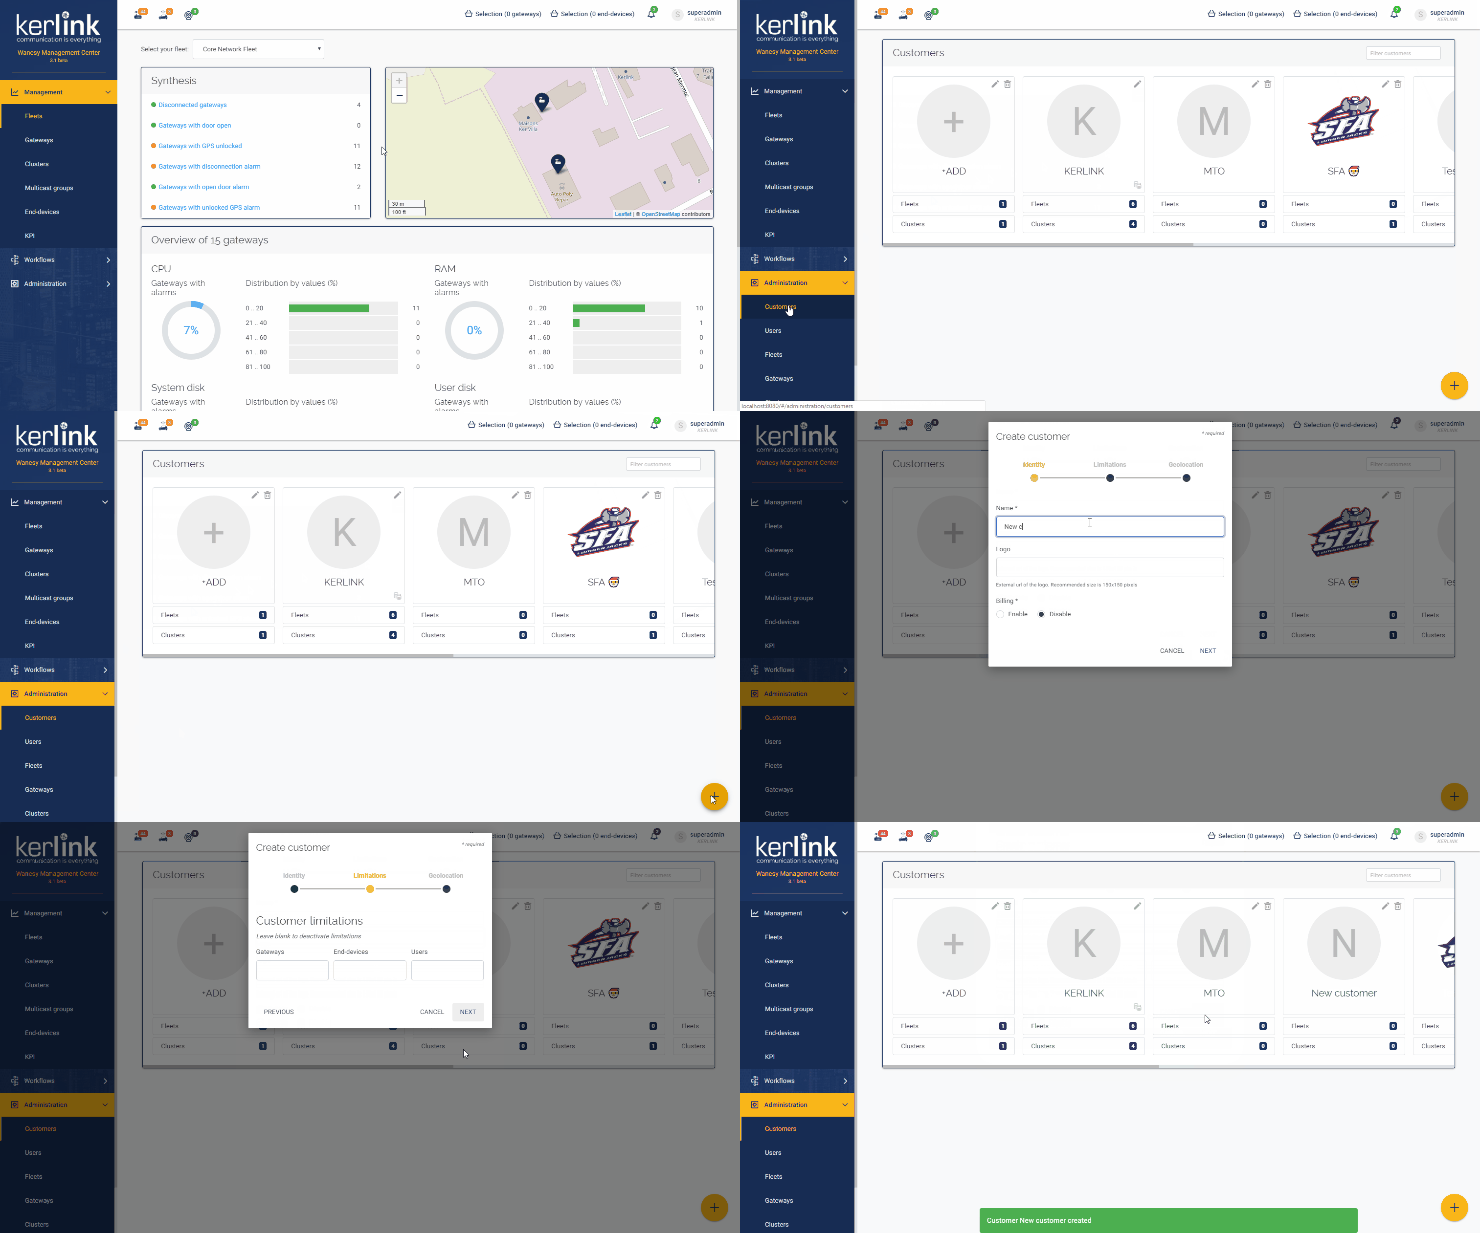
You have to create at least one customer. If you have several customers, create all your customers:
https://wmc-poc.wanesy.com/docs/administration/create-customer.html
(if needed, replace the URL domain wmc-poc.wanesy.com by your own)
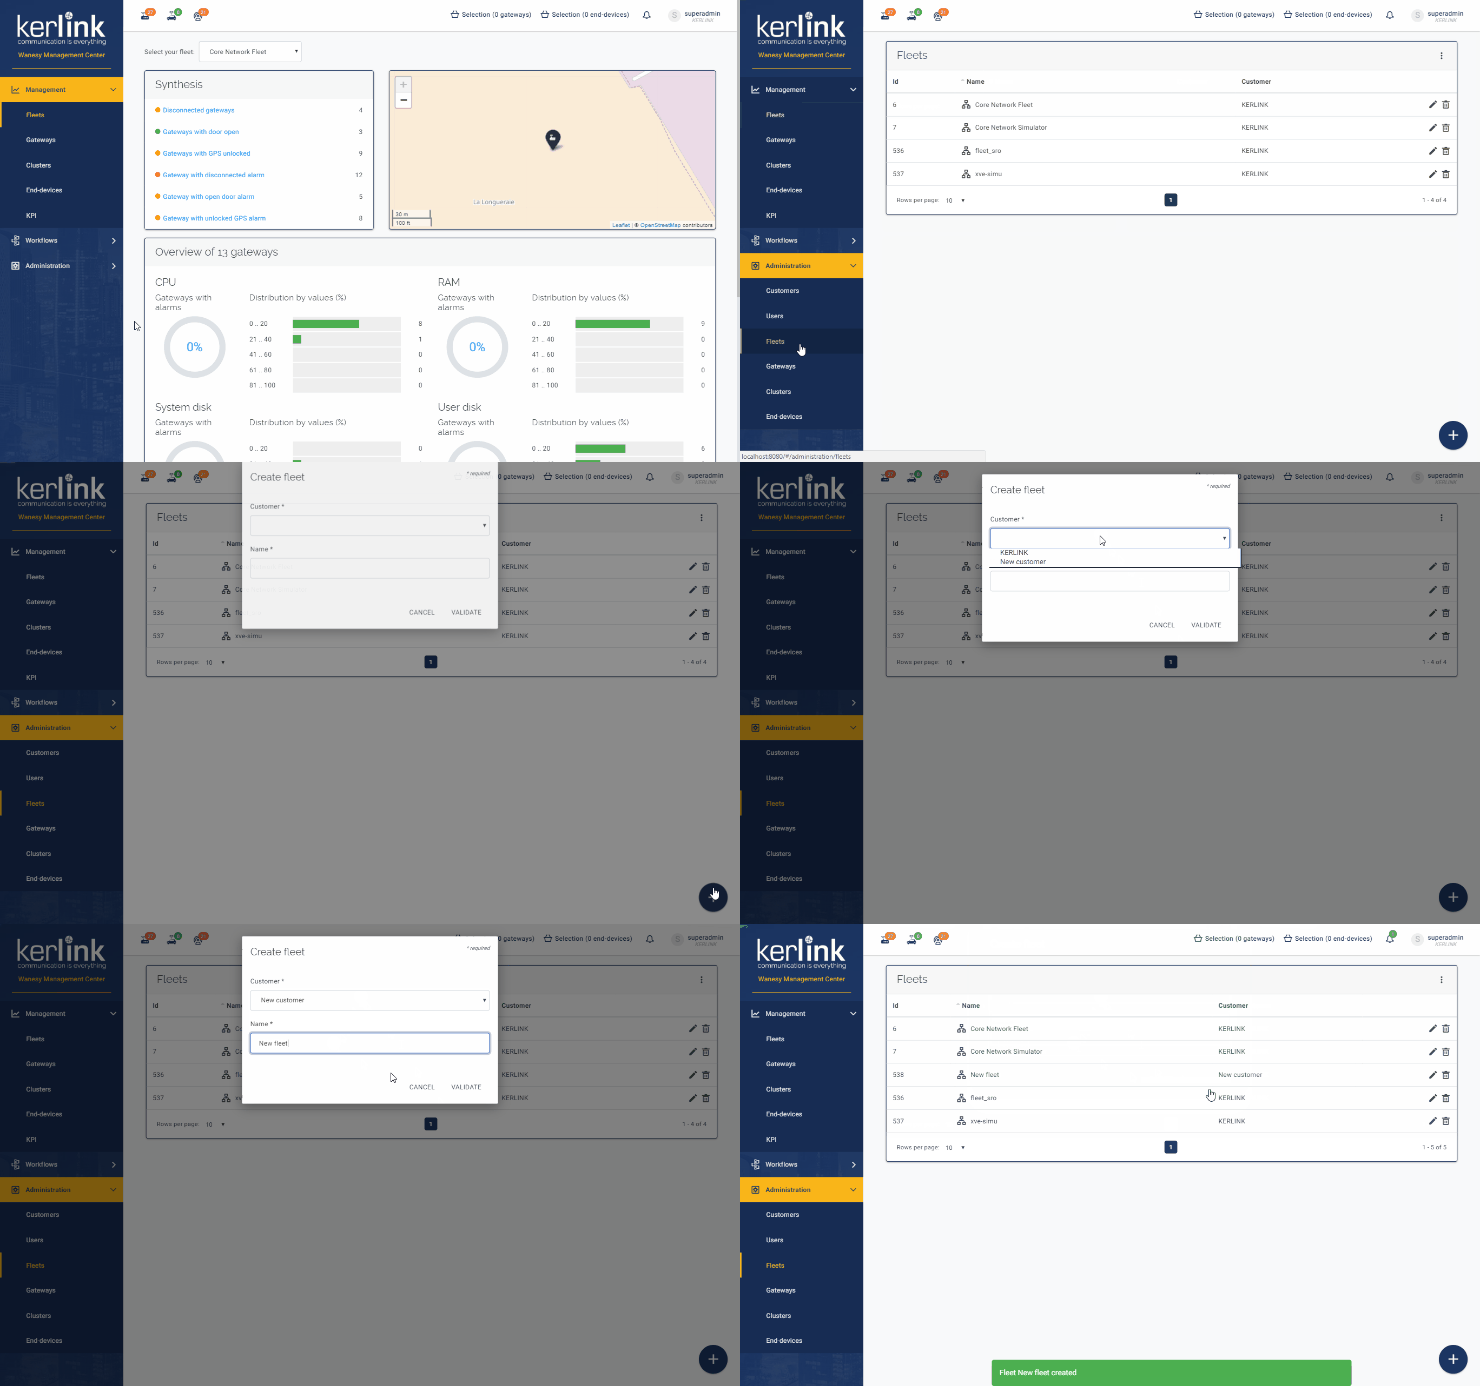
You have to group your gateways into a single fleet or in several fleets.
This a logical regrouping. You can for instance group all gateways that share the same country, or that belong to the same customer:
Click the following link to see how to proceed: https://wmc-poc.wanesy.com/docs/administration/create-fleet.html
(if needed, replace the URL domain wmc-poc.wanesy.com by your own)
You need to declare your gateways in the WMC database.
Click the following link to see how to proceed: https://wmc-poc.wanesy.com/docs/administration/create-gateway.html
(if needed, replace the URL domain wmc-poc.wanesy.com by your own)
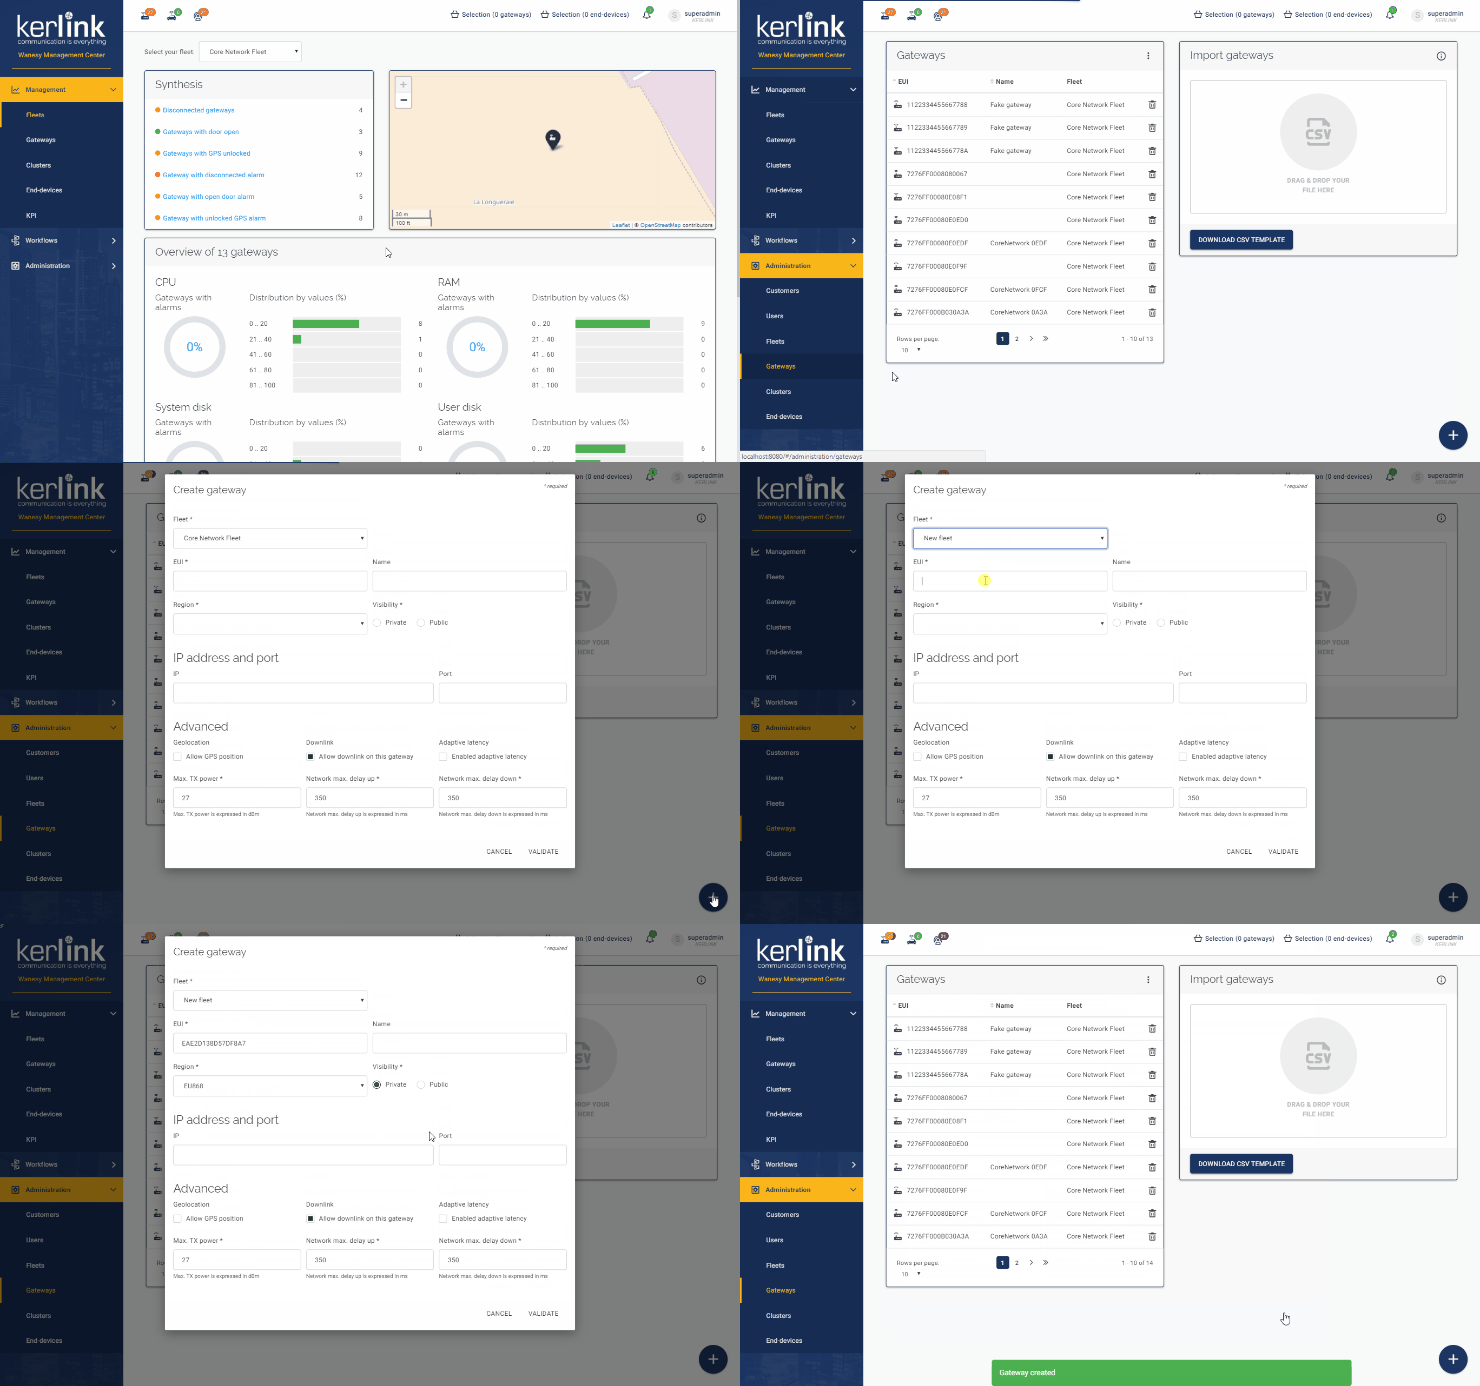
To declare a gateway, following information is needed:
Additional information:
EUI: To know how to obtain the EUI, click the following link: how_can_i_obtain_the_eui_from_the_serial_number_of_my_station
Brand: select the brand of your gateway (default is Kerlink).
Visibility: private indicates that your gateway will be visible only for the customer it belongs to. When declared public, all customers can see your gateway.
Max TX power: this is the maximum power delivered by your gateway (27-30 dBm, default is 27).
Network max delay up and Network max delay down are the delays to apply for the LNS to send downlinks to the end-device over the RX1 or RX2 windows.
Click the following link to get details about this feature: network_delays
Your end-devices can be grouped into clusters. You can define as many clusters as you want. A cluster can group all the end-devices that belong to a customer or group all the end-devices that share the same area/country/region.
Click the following link to see how to proceed: https://wmc-poc.wanesy.com/docs/administration/create-cluster.html
(if needed, replace the URL domain wmc-poc.wanesy.com by your own)
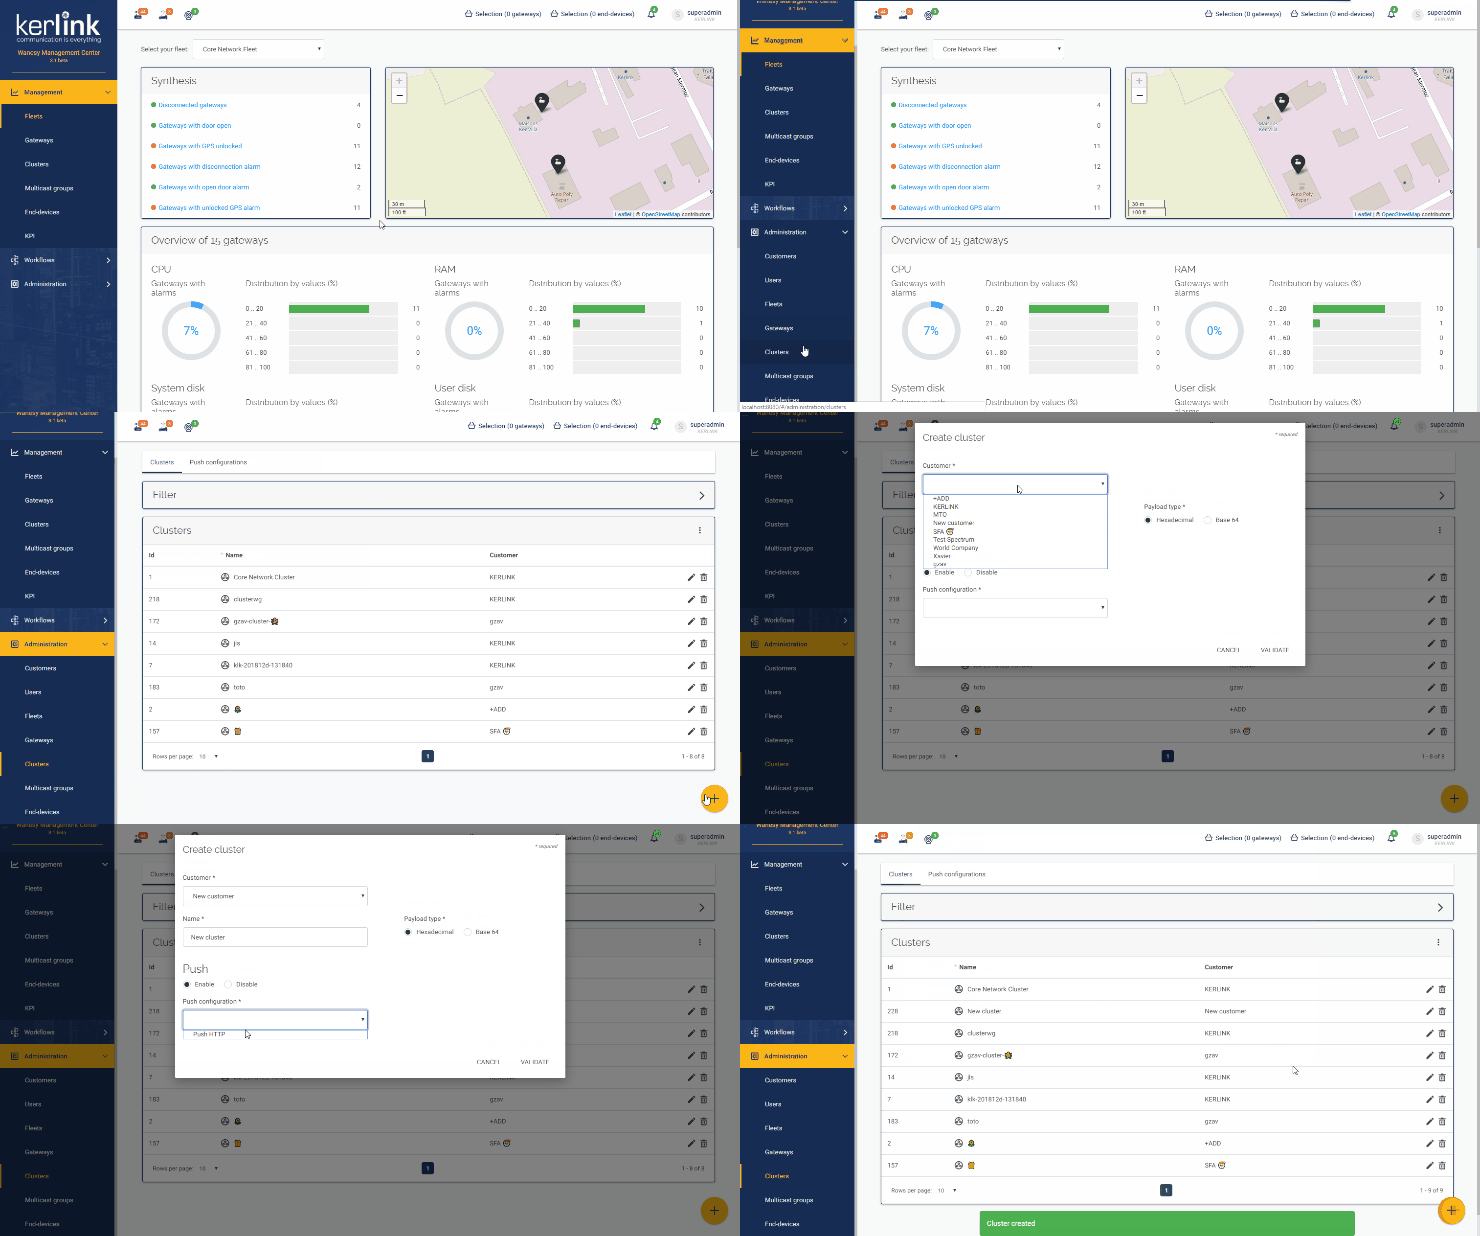
To create a cluster, you need to:
Select the “push configurations” after selecting CLusters from the Administration menu:
Click the following link to see how to proceed: https://wmc-poc.wanesy.com/docs/administration/create-push-configuration.html
(if needed, replace the URL domain wmc-poc.wanesy.com by your own)
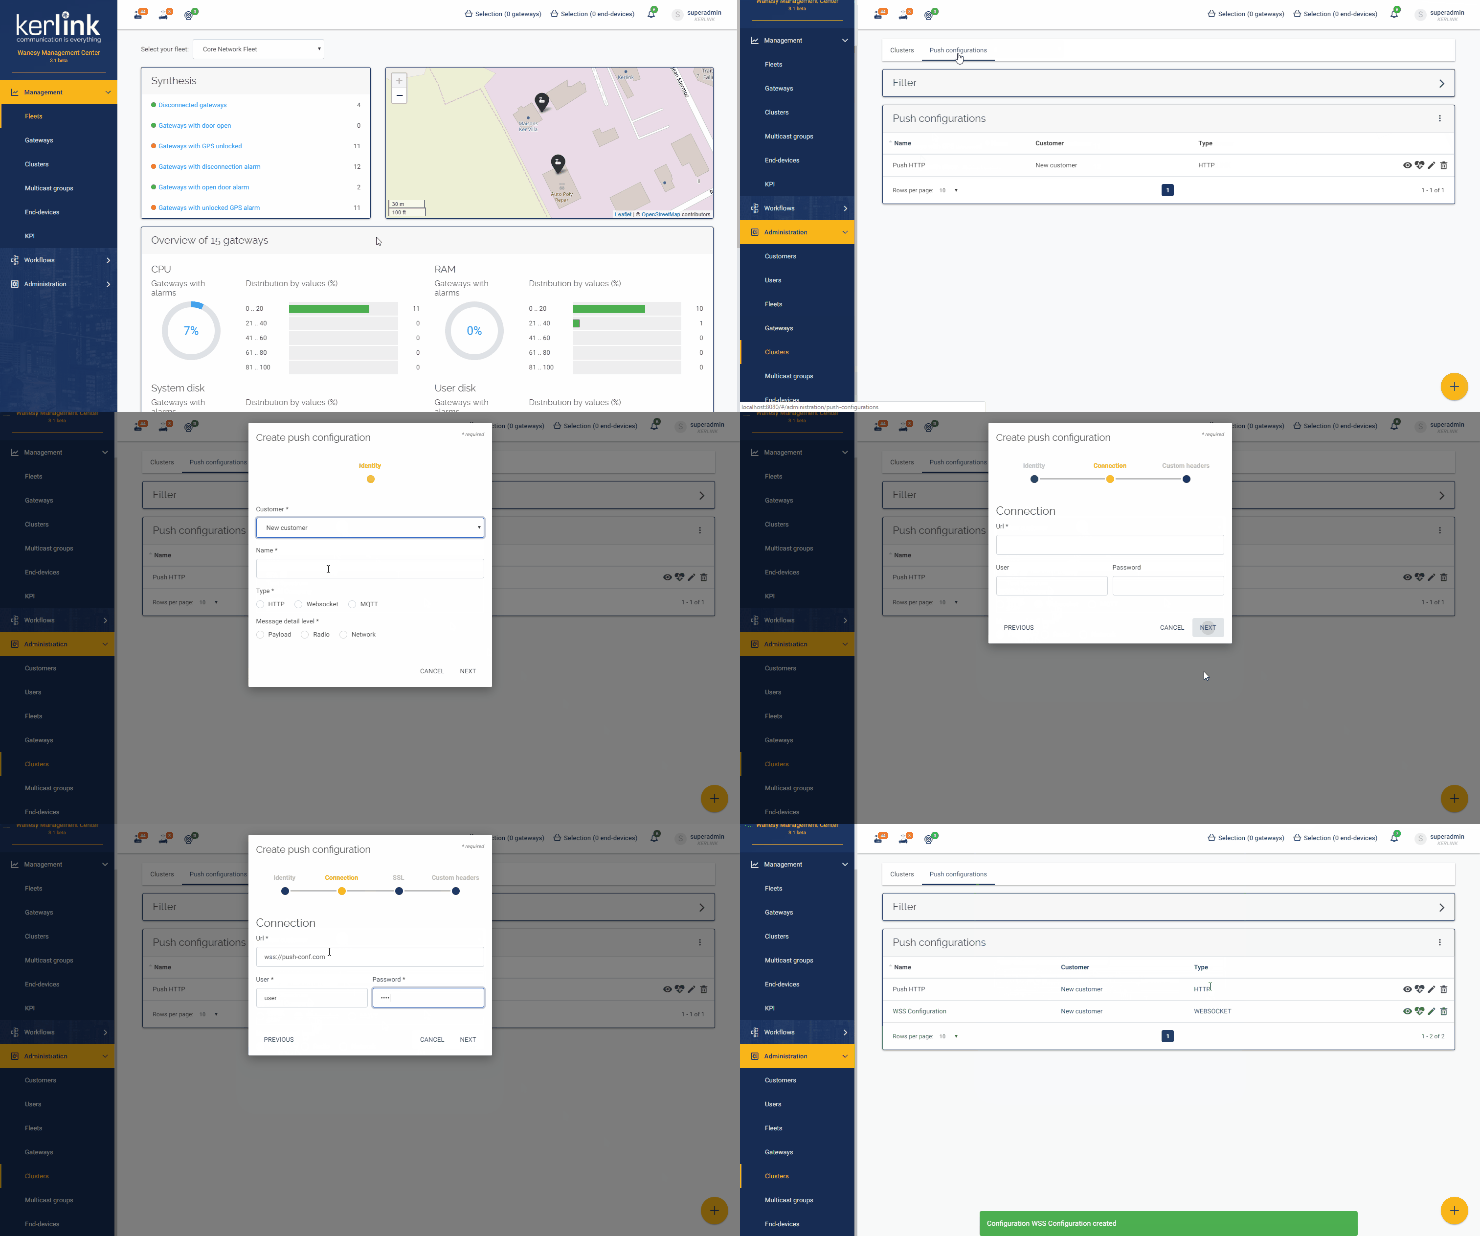
To create a push configuration, you need to define the following information:
About MQTT configuration, please read the following: FAQ: MQTT
For message detail level, 3 levels are available (from the less detailled to the more detailled):
To define the connection parameters, you need to specify :
Select the “Clusters” option after selecting Clusters from the Administration menu:
Fill the following information :
Click the following link to see how to proceed: https://wmc-poc.wanesy.com/docs/administration/create-end-device.html
(if needed, replace the URL domain wmc-poc.wanesy.com by your own)
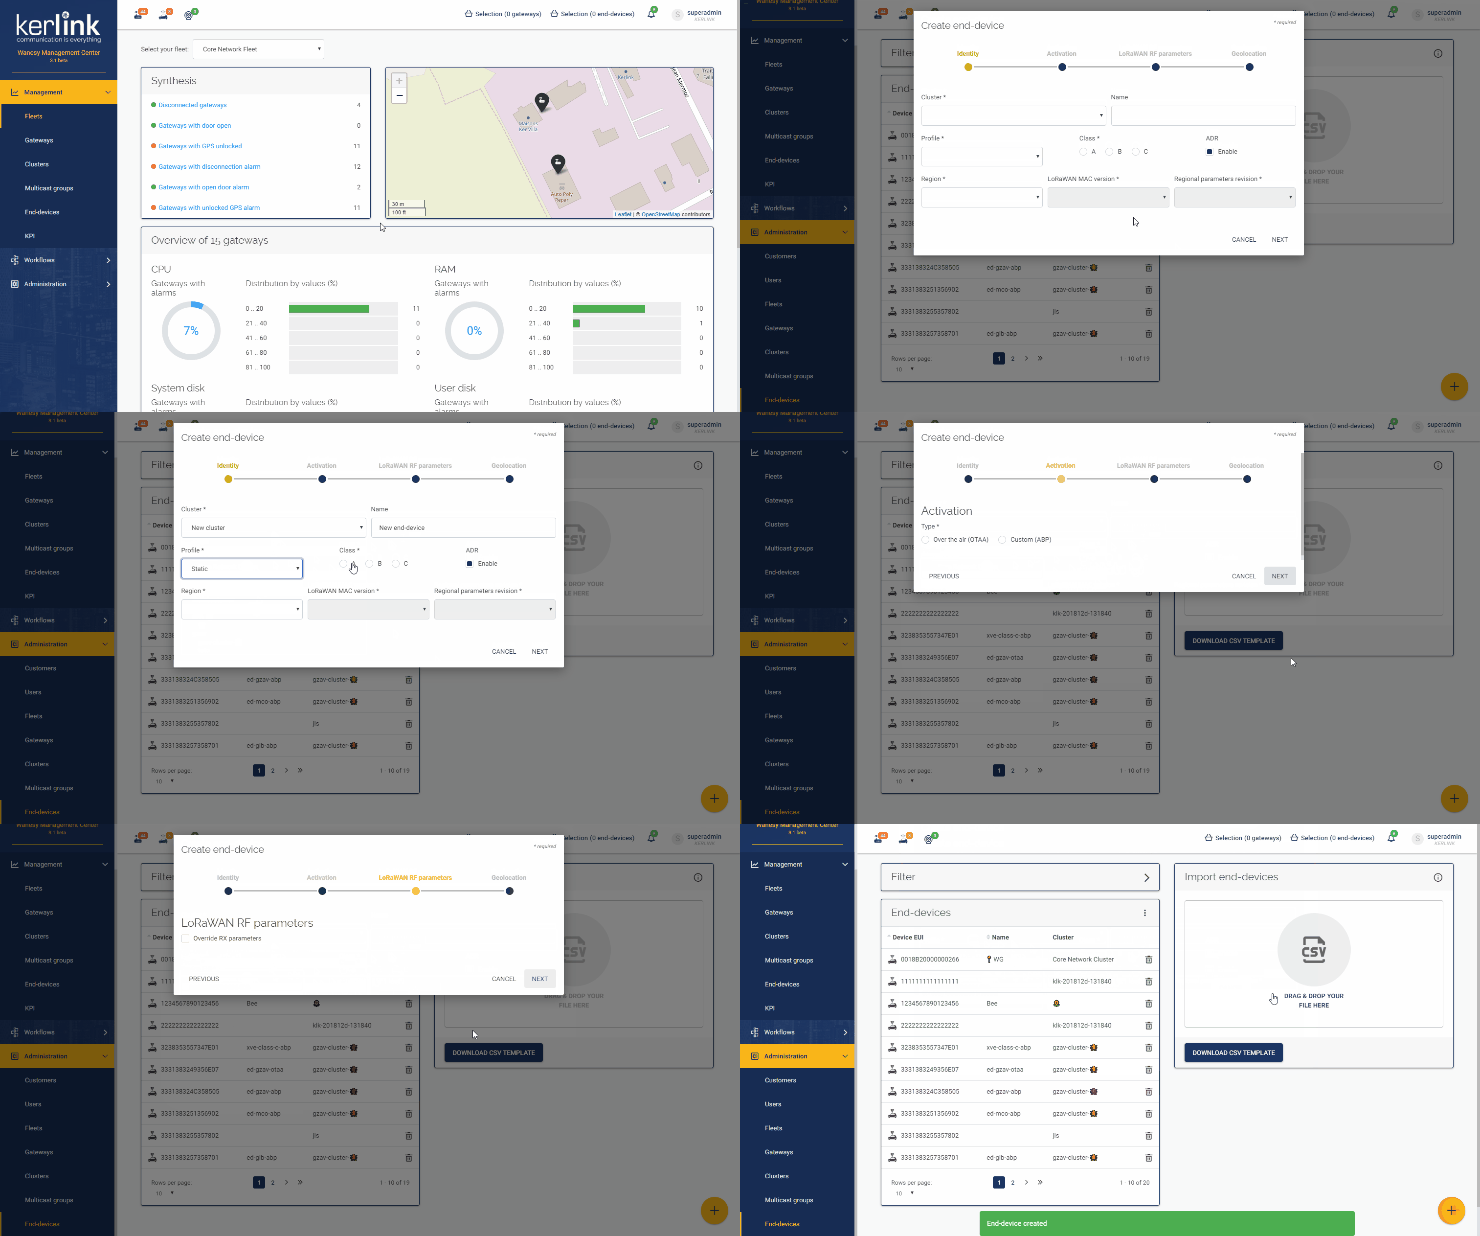
Select the “End-devices” option from the Administration menu:
Select the “+” icon to create your end-device.
Then fill the information requested:
For details about these parameters, please read the LoRaWAN® Regional Parameters from the LoRa Alliance: LoRaWAN® Regional Parameters v1.0.3RP2
Select the NEXT button.
Then select the type of activation for your end-device:
Depending of your selection, the next screen differs.
If you have selected the OTAA mode for your end-device, the following information is requested:
Enter the information requested:
This information should be provided by your end-device's Manufacturer or vendor.
If you have selected the ABP mode for your end-device, the following information is requested:
Enter the information requested:
This information should be provided by your end-device's Manufacturer or Vendor.
Press the NEXT button.
The following page invites you to define RF parameters.
Click the “Override RX parameters” checkbox if you want to set some network delays parameters:
Read the following wiki page to get details about the settings of the network delays.
For details about the settings of RX1, RX2 parameters, please read the LoRaWAN® Regional Parameters from the LoRa Alliance: LoRaWAN® Regional Parameters v1.0.3RP2
Press the NEXT button.
The next page invites you to set the geolocation parameters:
If you selected Manual, the following information is requested:
Press the VALIDATE button to validate all your parameters.